Etch Resist PCB Marker Pen Tutorial
We have put this little tutorial together for those who are a little unsure about the ability and quality of the etch resist PCB pen. These pens are of a high quality ink and resist all standard etching chemicals leaving you with just the copper tracks left on your PCB after etching has been completed.
A little care does need to be taken when drawing on your copper clad boards and it's not as simple as draw a line and your done. You do not have to do anything special with your copper clad board and as always we try to use as much as we can that you will already have at home rather than buying expensive stuff you don't really need.
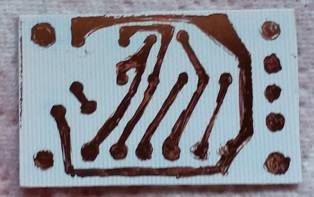
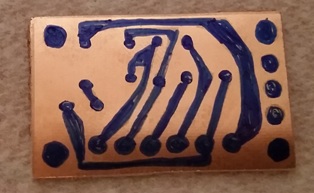 First of all you need to clean your board to make sure its grease free, makeup wipes or baby wipes are really good for this. Dry your copper clad board with kitchen roll. When you are ready to start drawing your PCB design onto your copper clad board you will notice some parts are streaky; don't worry just carry on and draw your whole design. To the right is a small circuit we have drawn and you will notice that it's streaky in places.
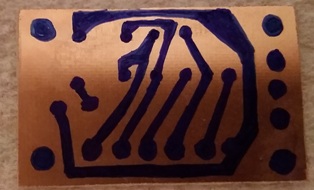
Although we could pass this board to our etching bath now there's a very good chance that the pen wouldn't stop the etching solution penetrating and dissolving the copper tracks that we need to keep. To ensure that we can get good results every time and not waste our copper clad boards or our etching solution we can draw over it again. Allow the pens ink to dry for about 5 minutes and you can draw over it again. This time you will see its covers easier leaving a strong dominant blue colour where we want to keep our copper tracks of the circuit.
Below is a simple circuit that we have drawn over for a second time. With this coverage we can rest assured that when the board is passed to the etch bath the copper tracks we need to keep will remain and our board will be of good quality.
Now that we have drawn our circuit on the copper clad board and given it a second coat of the pen we can submerge this in our chemical etching solution. These etch pens can not only be used on the standard copper clad boards to draw your circuits but can also be used on photo resist copper clad boards. Sometimes once you have placed your photo resist board in your developer solution they can very quickly become over developed and part of the tracks you need keeping can become patchy. You can use these pens to touch the design up before submerging it in your etching solution.
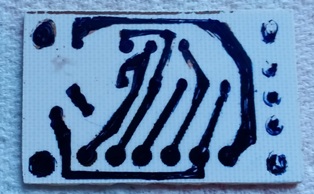
We produced two boards in this tutorial example, board one we quickly drew our circuit design on and board two we allowed to dry for 5 minutes and then gave it a second coat of the etch pen. We then submerged both of these boards in our etching solution so that you can see the results from both boards. Board one (below left) was our patchy board that we weren't confident would produce a useable board, board two (below right) is the board we went over the circuit design a second time with the PCB etch pen and although still not perfect we have produced a usable printed circuit.
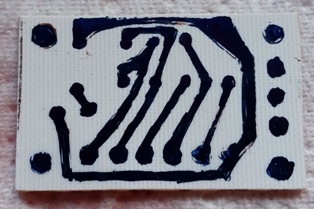
 The image right is our board two that we touched up with the second coat of the etch pen. We have now cleaned off the PCB pens ink. To clean it off all we used was some nail varnish remover. A good quality nail varnish remover is best; one used for removing acrylic nails, and then wash the board in hot soapy water. As you can see the copper tracks of our circuit are there and although a little patchy in places they are all continuous and would be good enough to provide a working printed circuit board. We could have taken a time a little more when drawing our circuit and produced better results but we wanted to show you how quickly and easily these can be produced and the different quality results you can get by taking your time.
We have tested both of these boards and both have continuous copper tracks and both could actually be used as printed circuit boards. Although they look a little rough these where both hand drawn quickly, one boards pen outline was very patchy and both have produced working results.
Remember to protect your copper tracks with Tin Platting and Green coat solder mask. If you have any questions please feel free to contact our support team who are on hand to answer any questions that you may have.